
Share this:

BlocksCAD is a 3D model editor that you use in a web browser, and it runs on Raspberry Pi. You drag and drop code blocks to design 3D models that can be exported for 3D printing.
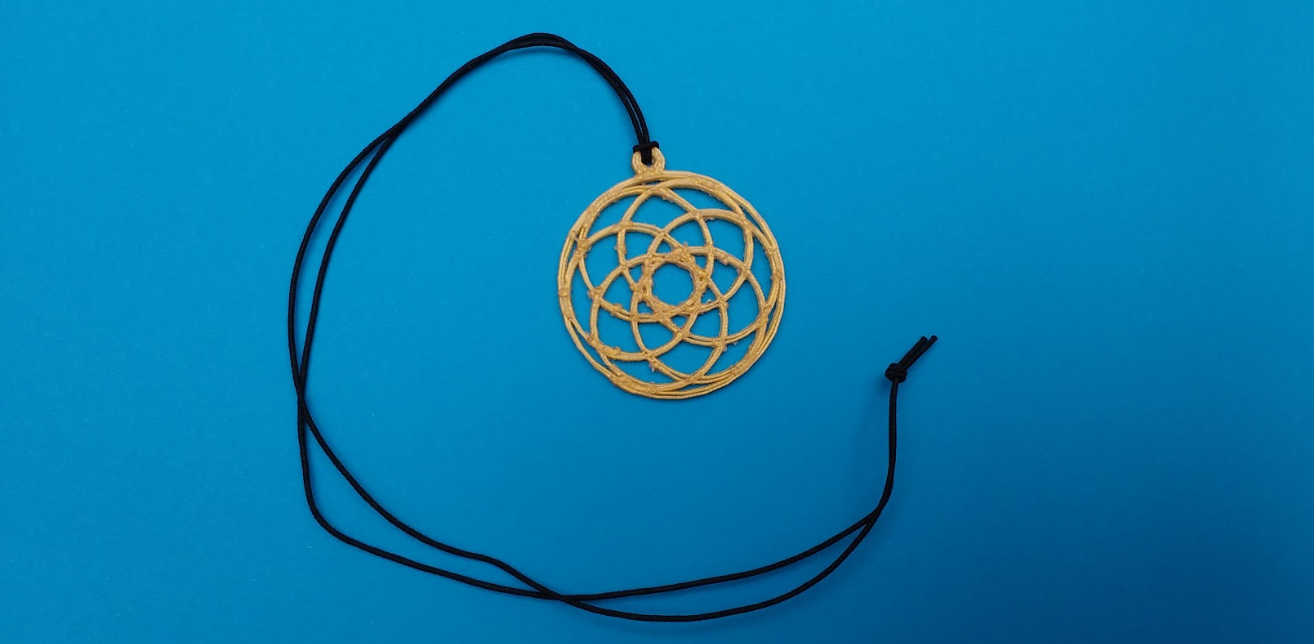
In this project, you will use BlocksCAD to design a 3D pendant. The pendant uses a geometric pattern based on ‘the flower of life’, a design which is often found in historical art.

The finished pendant with a cord threaded through the small hanging hoop
If you have access to a 3D printer, then you can print your pendant. The pendant is small and only uses a little bit of filament. There’s a hoop on top of the pendant so that you can put it on a necklace or cord. The pendant has a diameter of 40 mm, plus the hoop for hanging. It is 2 mm thick, so it will 3D-print quite quickly.
After this project, you’ll also be able to code your own design and create a custom pendant.
Step 01: create a hoop
This project can be completed in a web browser using BlocksCAD. Open Chromium and enter the BlocksCAD editor URL: blockscad3d.com/editor.

The design uses six interlocking hoops in the centre, and a larger hoop around the outside. As mentioned, the pendant is 40 mm wide, plus the hoop for hanging, which is 2 mm thick.

Click 3D Shapes and drag a cylinder block to the project. Create a cylinder with a radius of 12, and a height of 2 (the unit here is millimetres). Cylinders are automatically centred along the X and Y axes. Select not centered so that the pendant sits on the surface. (This means that the Z-axis value is greater than 0.)
![]()
Click on the Render button after each change to your code to see the results.
Step 02: add more hoops
Now, drag a difference block from Set Ops to encase the cylinder. Add another cylinder block in the bottom space, and this time give it a radius of 11 mm. This will remove a smaller cylinder from the centre. This creates a hoop. Click Render again to see it.
If you like, you can click on the coloured square to change the colour used in the viewer. This does not affect the colour of your pendant, as that depends on the colour of the filament that you use.
The design uses six intersecting hoops, and each hoop is moved out from the centre and rotated a different number of degrees.

In the final design, there is no central hoop: the hoops are all moved out from the centre.
Drag a translate block (from Transforms) around your code, and set X and Y to 5. This moves the first hoop into position.
Step 03: centre the hoop
Now the hoop is a little off-centre. You need multiple copies of this hoop, rotated around the centre. First, create three equally spaced hoops.
Add a count Loops block to create three hoops. To space the hoops, add a rotate Transforms block between the count loop and the translate block.
In the count block, set the i variable from 1 to 3. You’ll need to insert an arithmetic block from Math and a variable (i) block from Variables into the Z field of the rotate block.
The rotation moves each hoop by 120 × i degrees, so that the three hoops are distributed equally around the 360 degrees of a circle (360 / 3 = 120). Look at the code and make sure you understand how it works. The finished design has six hoops rather than three. In the count block, set i from 1 to 6, and set the Z rotation to 60, so it creates six equally spaced hoops.
Step 04: add a border
Next, add a border around the edge of the design. Create a centred hoop that touches the edges of the design. You can either do the maths to work out what the radius of the circle needs to be, or you can just create a circle and change the radius until it works. Either approach is fine!
Encase your code with a union block from Set Ops, to join the border to the other hoops. Add a difference block to the plus section of union, and two cylinder blocks to make the hoop.

The six hoops each have a radius of 12 mm, so the border cylinder that you are making needs to be bigger than that. You could try setting the radius to 24 mm.
To make a hoop, the radius of the second cylinder in the difference block needs to be 1 mm smaller than the radius of the first cylinder.
Adjust the size of the cylinders until the border hoop just touches the outer edges of the six inner hoops.
The radius should be around 20 mm. (As mentioned in the introduction, the finished pendant will be 40 mm in diameter.)
Step 05: work it out
You could also use maths to work out the diameter. The diameter of each inner hoop is 24 mm. If the hoops met at the centre of the pendant, the border hoop would need to have a radius of 24 mm. But the inner hoops overlap, as they are translated 5 mm along the X and Y axes.
This removes a section from the radius. This section is on the arc, 5 mm from the origin, so we need to remove 5 mm from 24 mm. Thus the inner radius of the border hoop should be 19 mm.
Maths is really useful when you need to be accurate. But it’s fine to just change things until you get the result you need.
Step 06: add a hanging hoop
Now, add a small hanging hoop through which you can thread a cord to make a necklace.
Click the [+] on the union block to add another section to add the new hoop.

At the moment, the position of the hanging hoop isn’t very visually pleasing.
Add a rotate block to move the inner hoops so that the hanging hoop is centred over one of the gaps between them.
Step 07: experiment with shapes
Experiment and change some values in your pendant. For example, change the number of hoops, or the rotation.

You could also try to use cuboids (cubes) instead of cylinders to create a pattern.
Step 08: export to STL
BlocksCAD 3D can export an STL file for 3D printing. Render your model and then click on Generate STL. Remember where you save the STL file. Now 3D-print your pendant using a filament of the colour of your choice. Very carefully remove the 3D print from the print bed. The pendant is thin, so it’s quite delicate.
You might need to remove small strands of filament (especially from the hanging hoop) to tidy up the print.
Thread the pendant on to a chain or cord. If you want to use a thicker cord or necklace, then you can adjust the design to have a larger hanging hoop.
Check your code
You can download the full code and check it against your own. You can also check out our projects page, where you’ll find more images and step-by-step instructions for using BlocksCAD.
This project was created by Dr Tracy Gardner and the above article was featured in this month’s issue of The MagPi magazine. Get your copy of The MagPi magazine issue 89 today from your local newsagent, the Raspberry Pi Store, Cambridge, or online from Raspberry Pi Press.
The post Design 3D prints with a Raspberry Pi and BlocksCAD appeared first on Raspberry Pi.
This article was first featured at https://ift.tt/2Qz0RsR on January 8, 2020 at 10:41AM by Alex Bate


More Stories
Can this possibly be true? “Metal 3D printing is now possible on any 3D printer…with the right settings and a few minor upgrades like a hardened steel nozzle…” – July 2 2023 at 04:59PM
New NASA Funding Ignites 25 3D Printing Projects in Space Exploration – June 18 2023 at 04:34PM
Nvidia AI produces 3D models from 2D videos 3D printing applications forthcoming? – June 15 2023 at 02:55AM