
Share this:

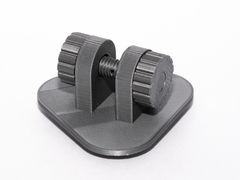

I made this to hang photos – it could be used for any purpose though. I fixed the base to the wall using 3M double sided tape.
One end if the string is tied to the fixed “base”. The other end is tied to the bolt after passing it through the hole in it. Adjust the tension by turning the bolt, pushing it into the slots (on one side of the base) and tightening the nut on the other side.
Printing tips :
- I printed the “fixed” base at the highest speed I was comfortable with (0.2mm).
- The other base was printed at a lower speed (0.2mm Quality on Prusa)
- The nut/bolt was printed with a lower layer heights of 0.15mm.
- Did not add much infill for the nut (15-20%).
- The bolt had a 50% infill. I added a 100% infill region near the hole in the nut.
- I needed 2 pairs. The print was done in 3 sessions : 2 base, 2 “fixed” base, 2 pairs of nut/bolt.
.
.
.
Consider tipping if you like/use the model. 🙂
Consider being a patron. The plan is to push out 3D models regularly 🙂 : https://www.patreon.com/stanzlavos
This article was first featured at https://ift.tt/336nzNY on March 9, 2020 at 02:27AM by stanzlavos


More Stories
Can this possibly be true? “Metal 3D printing is now possible on any 3D printer…with the right settings and a few minor upgrades like a hardened steel nozzle…” – July 2 2023 at 04:59PM
New NASA Funding Ignites 25 3D Printing Projects in Space Exploration – June 18 2023 at 04:34PM
Nvidia AI produces 3D models from 2D videos 3D printing applications forthcoming? – June 15 2023 at 02:55AM