
Share this:

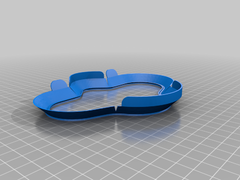

This is a face gasket I desinged for my personal mask design. I started on a NanoHack face mask design. And I have not diverged enough from that basic design such that this gasket is incompatible with the original NanoHack.
To be clear, this is meant to be printed out of a flexible material. I’ve been printing out of TPU that is soft enough to make it functional and comfortable while getting a good seal. The seal is critical and this has worked very well for me.
It’s designed to be printed without supports. It doesn’t exceed 45degrees of overhang.
The base of the gasget has a cut or groove in it, meant to be physically captured by an adhesive or glue. Though, I’ve been using a 3d printing pen loaded with PLA to affix it to my mask. TPU can bond to PLA at high enough temperatures and I’ve had good luck with it. I had to turn my 3d printing pen up to 205-210 degrees to get a good bond. Lower temps did not yield a good bond.
The various cuts and flaps are designed to allow the gasket to deform to fit the mask and face, without offering up structural resistance. This took a lot of iterations to get right. And since I’m socially distanced 🙂 I’ve been unable to test it on a varity of face shapes. However, I think at the very least, it serves as a starting point. You can use a pair of snips (small wire cutters) to take extra cuts, wedges and chunks out of the band if you find you need to release some more tension than I already did.
I’ve included the FreeCAD source files along with the STL just incase anyone wants to modify it.
I am not a scientist, engineer or medical professional. I don’t know if this design is functional or dangerous. But I’m providing it anyway in an emergency situation.
For me, I was using some adhesive backed craft foam in earlier mask builds. For various reasons, I wasn’t satisifed with that solution. Since I do have TPU and my printer is good with flexibles, I decided to give this approach a go. For me, I’m getting a better seal with the gasket than I ever did with the foam.
To be clear: First, I thermo-form the mask to my face, getting as good a seal as I can within reason. I pay special attention to the nose bridge and cheek transition. Then, I attach the gasket using the 3d printing pen. I start with the nose, which is the hardest part to get right, and move around the gasket in both directions, until I finish up with the chin. Once it’s in place, I test the fit again. I can make further adjustments using thermo-forming of the mask, to deal with any areas that are not quite right, with the gasket in place. The gasket changs the fit a bit so it’s pretty normal to need to do this.
This article was first featured at https://ift.tt/2w3NbPm on March 30, 2020 at 06:13PM by bjf200


More Stories
Can this possibly be true? “Metal 3D printing is now possible on any 3D printer…with the right settings and a few minor upgrades like a hardened steel nozzle…” – July 2 2023 at 04:59PM
New NASA Funding Ignites 25 3D Printing Projects in Space Exploration – June 18 2023 at 04:34PM
Nvidia AI produces 3D models from 2D videos 3D printing applications forthcoming? – June 15 2023 at 02:55AM