
Share this:


Attribution:
Erik Cederberg / 3DVerkstan
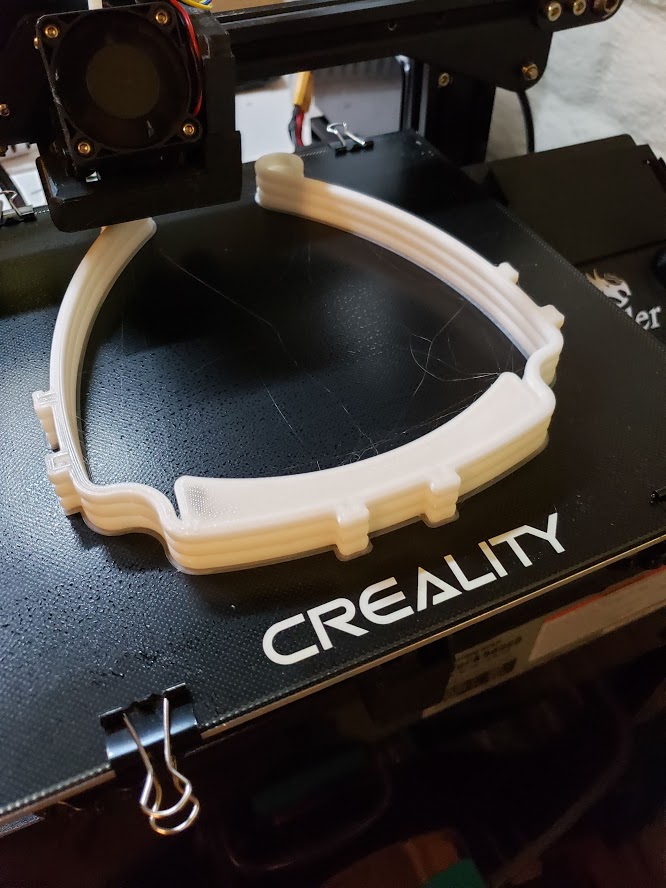
This is just my version of the awesome, efficient 3DVerkstan US 6 hole v3 face shield. I remodeled it to give it more rounded edges so there are no sharp edges to dig into your forehead while you’re wearing this for a 8-16 hour shift (… or more).
It is designed such that it angles the clear sheet away from your face, still allowing space for something like an N95 respirator. One size fits all and if you need it a little bit tighter, you can add a rubber band to the back.
I’m also creating several stacked versions (coming soon, will upload here).
The plastic shield can be made out of any semi-stiff plastic sheet between 0.1 and 1mm, including overhead film, cover sheets for binding machines etc, as long as it is available in a suitable format. We’re using the Letter Size PVC Binding Covers that you can find at office supply stores or online (most common).
The templates for punching the holes are also attached (can use a 3 hole punch for expediency).
For help with print settings:
https://3dverkstan.se/protective-visor/protective-visor-print-guide/
You need approx a 210x210mm build area to print two at a time, and about 160x190mm if you are OK with only doing one at a time (at least until I finish the stackable version).
I’m printing these on a CR-10S 400 with a 400x400mm build area and a 0.8mm nozzle and they take roughly 25-30 minutes per part. MUCH faster than the majority of the other options and is still comfortable to wear all day.
Comment if anything is wrong, you have suggestions, etc.
Link to original source: https://www.youmagine.com/designs/protective-visor-by-3dverkstan/
STACKED VERSION INSTRUCTIONS (IMPORTANT TO READ THIS):
WARNING: TEST THE STACK OF 2 FIRST! IF YOU DON’T READ IT, YOUR PRINT WILL MOST LIKELY FAIL. You don’t want to start off with the stack of 20, you need to test the stack of 2 first to make sure that you can separate the parts, that the upper one comes out clean enough to use, etc.
The basic idea here is to get a 2-layer gap between the parts so if you’re using a 0.2mm layer height, try the 0.4mm gap. BUT NOTE: Every single machine is different. You may find that the 0.3mm works better – as it did on my machine. Each print is 5mm tall so use a layer height that divides 5 well (such as 0.25mm). If you’re using a 0.8mm nozzle and printing at 0.4mm, print at 0.4166 or 0.5 instead (and in this case, setup multiple processes as described below.
MULTIPLE PROCESS METHOD: You can also set layer heights for the part separately from the layer gaps by setting up multiple processes (example in photos). Each print is 5mm high so the first process would be from 0 to 5mm on the Z, then the next process would be the gap – if you’re using a 0.3mm gap, set this process’ layer height to 0.3mm – so that would be from 5mm to 5.3mm on the z. Then the next print would be from 5.3mm to 10.3mm (another 5mm tall face shield).
This video may describe it better (towards the end):
https://www.youtube.com/watch?v=MHKBvk8IAc0
My video for setting up processes: https://drive.google.com/file/d/1JUDM6_TufcjHYmyFVTLxHgyLLTgDzE_J/view
SOME IMPORTANT SETTINGS:
- Optimize start points for fastest printing speed.
- Outline/Perimeter Shells: 2-3 on a 0.8mm nozzle or 4-6 on a 0.4mm nozzle.
- Top and bottom solid layers: 3-4 & 3-4 for 0.4mm layer height (larger nozzles), 6-8 & 6-8 for 0.2mm layer height (smaller nozzles).
- Infill: 20% full or fast honeycomb.
- Skirt/Brims are optional. If you have a purge command (where it wipes away plastic ooze before it starts the print), then you probably don’t need it. Might be able to put that little bit of extra plastic towards more face shield frames!
- NO SUPPORTS. Yes there is a gap, but it’s meant to be that way. Turn supports off.
- Thin Wall Behavior: Extra thin wall type: Perimeters only. Internal thin wall type: Allow single extrusion fill (Simplify3D).
- Outline Direction: Outside-in (starts with outer layer then does inner layers next).
My video for separating them:
https://drive.google.com/file/d/1uisrz9kxHH1SYmytejdOa5SCahb6hHGg/view
This article was first featured at https://ift.tt/2RrxCs8 on April 11, 2020 at 07:18PM by DotScott1


More Stories
Can this possibly be true? “Metal 3D printing is now possible on any 3D printer…with the right settings and a few minor upgrades like a hardened steel nozzle…” – July 2 2023 at 04:59PM
New NASA Funding Ignites 25 3D Printing Projects in Space Exploration – June 18 2023 at 04:34PM
Nvidia AI produces 3D models from 2D videos 3D printing applications forthcoming? – June 15 2023 at 02:55AM